This was a minor pain in the ass, and I’ll go into some detail about the problems I had. I’m complaining a lot in this post.
I’m living in a relatively old house, and the fixtures haven’t been replaced, because they’re built like freaking battleship plumbing. It’s all brass, and the hard and heavy stuff. I have little desire to ever replace brass with plastic, even though I have done so many times.
I repeat: I have replaced brass with copper or plastic parts, many times. Here’s my complaint (you can skip forward if you don’t like rants):
- Errant turn of the aerator twisted the guts of a spigot.
- Plastic supply valve just stopped closing.
- Plastic supply valve “brass” knob broke off.
- Ball valve got stuck.
- Loosey goosey handles on single-handle faucets, all the time, because the set screw got loose.
- How many freaking Moen cartridges have I installed? Too many.
- How many Fluidmaster and Korky toilet tank valves have I replaced.
- Fancy kitchen faucet basically stopped working and developed leaks. The simpler replacement has worked better, but it’s got lots of plastic on it, and I don’t think it feels right.
That’s why I don’t like replacing it. The new designs are amazing, but they just don’t last very long.
This shower was installed around 1960, and it’s still working. It looks like hell, and needs new tile, but other than that, the plumbing still functions fine.
So, the faucet started leaking a lot, and I just gave up on overtightening the handle. I had to install new washers.
How to DIY
I didn’t have washers handy, so I looked online, and found a Mainstay brand “assorted washers” kit on the WalMart site. It cost $5+, and the WM is a few blocks away, and I wasn’t willing to drive out to pay $2 for a pair of the appropriate washers. I figured “assorted” meant something in there would fit.
The tools I needed were these special shower valve socket wrenches for removing these stems.
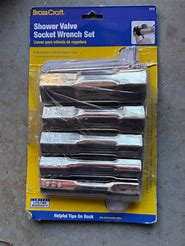
I also needed:
- screwdrivers to remove the handles, turn screws
- a pipe wrench to give a little more force on those wrenches
- teflon tape
- plumber’s putty (optional)
- and tools to dig a hole into the washers (more on this later): an awl, utility knife, self tapping metal screw, sheetrock screw, needlenose pliers, whatever you have
Shutting Off the Water
There’s no shutoff for the shower, so I had to shut the water off to the house.
I closed the main gate valve, but it closes a bit odd, so I have to close it all the way, and then back it off a bit. To find the sweet spot, I open up the water hose, so all the house water drains out, and saw a trickle.
I backed off the gate valve until the trickle stopped, or nearly stopped. I kept it open.
Then I went in and opened the sink faucet to the “hot” position, and then the bathroom faucet to the “cold” position. This way, all the water’s drained.
Removing the Valve Stems
First, I removed the handles, and then the cylindrical silver things, which I don’t know the name of. Those tubes are important.
I used the socket wrenches to remove the stems.
My first attempt was wrong. I ended up removing the packing nut at the top of the valve. No harm done, though.
I went in with a larger wrench that fit on the bigger hexagonal nut, and gave it a turn, with the pipe wrench to help.
You can kind of see the stem here. The wrench fits where the purple arrow points.
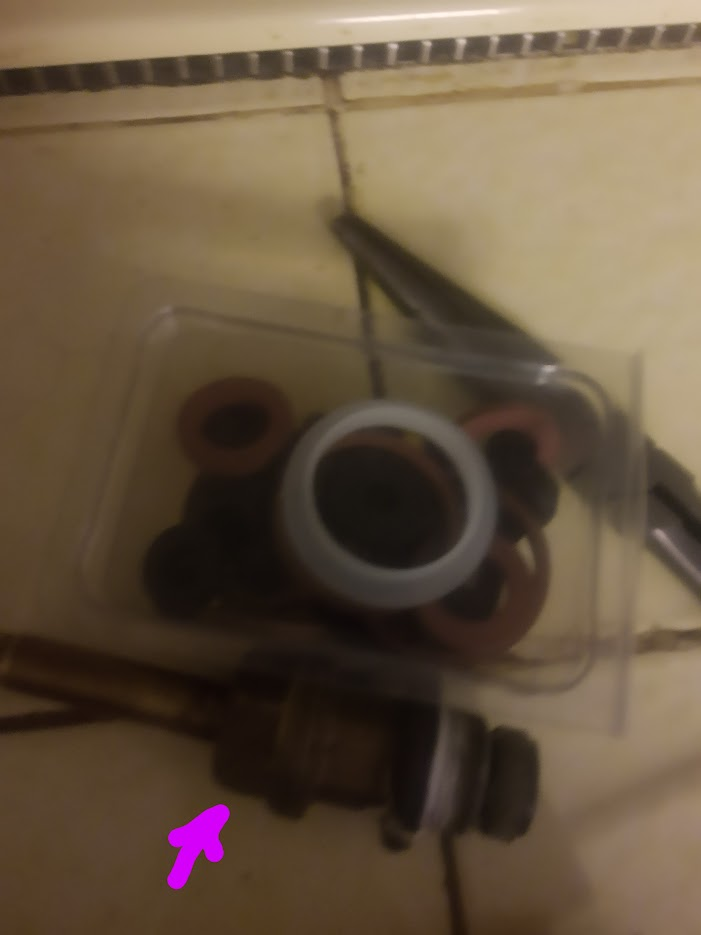
I was under the impression that I had some red polyurethane washers in there around 25 years ago, but, someone had replaced them with regular neoprene ones in the interim.
Washer Problems
There wasn’t an appropriate washer for this particular stem. I believe the correct washer is:
- Price Pfister type 3/8″ with a 3.5mm hole. (This is a link, but I would just buy it locally, tbh. https://www.walmart.com/ip/Price-Pfister-Type-Shower-Stem-Washer-3-8-Neoprene-Washer-1105-10-per-pack/1785440066)
Here’s a photo of the old washer:
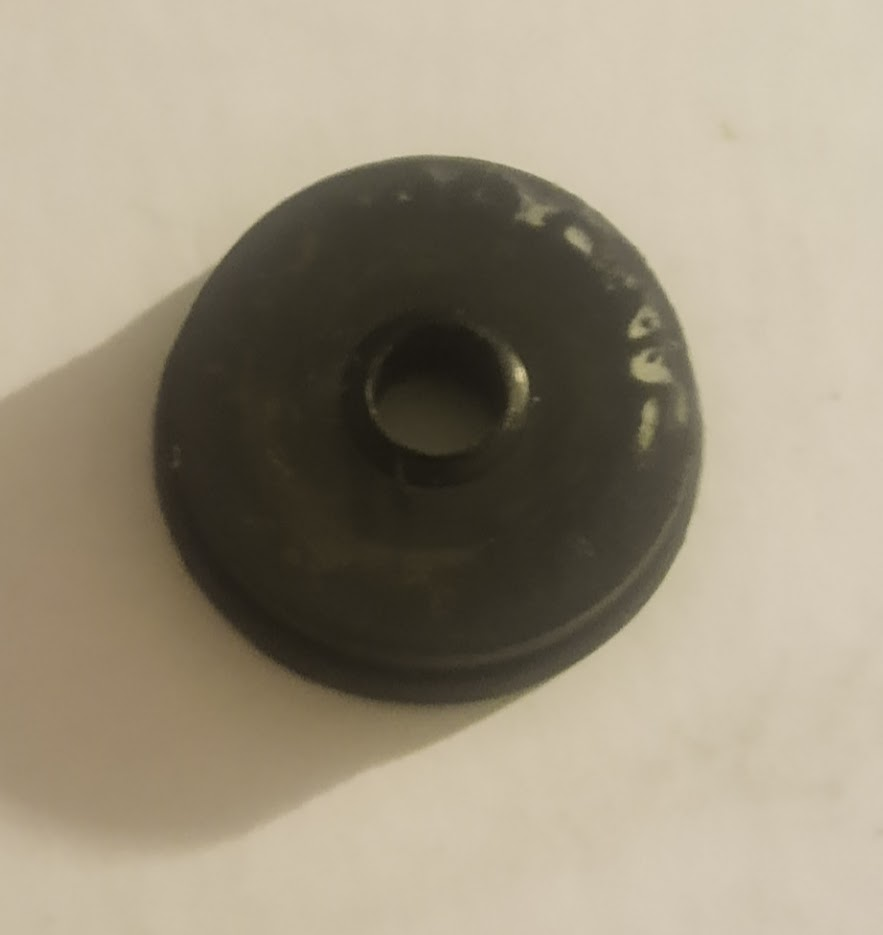
Here are photos from the website for washers I think are correct.

Since the “assorted washers” didn’t contain one of these, I found a weird non-washer that was in there – a disk slightly smaller than what was required, that didn’t have a hole in it.
I used an awl, and then various screws, knives, and other tools, to try and dig a hole into the disc. Some tools I used:
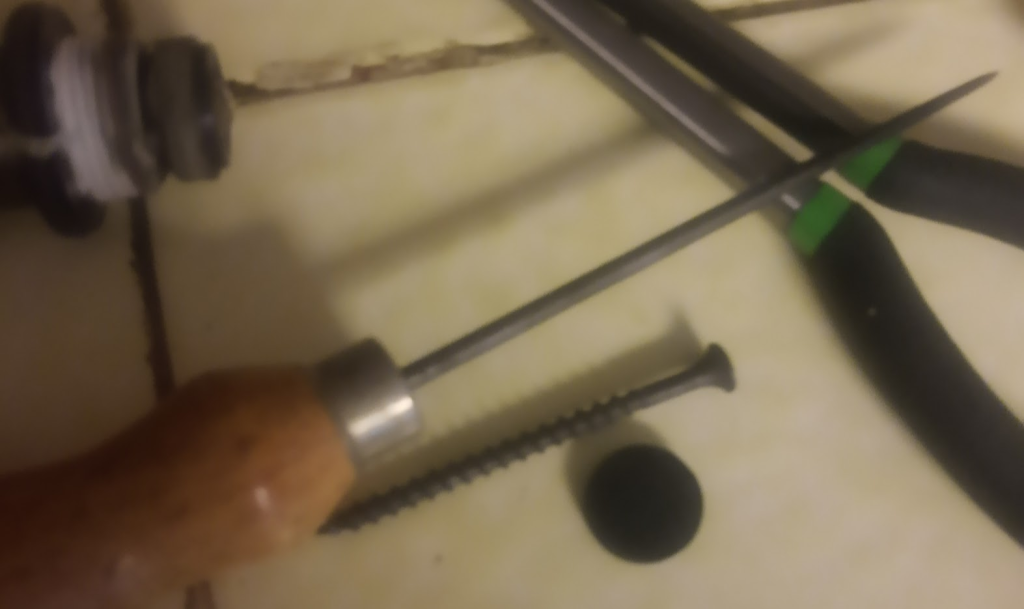
You can see the black disc with no hole near the bottom of the photo. I had to carve the hole into there.
Eventually, I manged to get enough material removed to shove the screw into it, and got it installed.

You can see that it doesn’t sit right in the center, and it’s a little bit squishy. It’s also not very tall, and sits almost flush with the edge of the cup that holds the waster. This thing isn’t going to last long.
Reinstallation was the reverse of removal.
Used teflon tape to lube up all the threads before reassembling.
Remember to install the valves with the handles in the “open” position, turned almost fully counterclockwise (to the left). If you don’t do this, the washer will rest against the seat, and prevent you from tightening the valve.
Worse case scenario is that you damage the seat or the washer. So: install it open.
Then, once installed, close it up. I don’t go super tight on this.
Hacks
The packing material was still good! I don’t remember replacing it, but I’m a nerd about packing material, and usually remove and replace it, or add a little bit. This time around, I didn’t have any, so I pulled out some Teflon tape and twirled it into a string, and packed it loosely into the top of the valve.
Put the packing nut on there, hand tight (with the wrench). Don’t crush the material too hard.
Before turning the water back on, I like to remove the aerators. When the water restarts, it kicks up a lot of debris, and you also get some water hammer that will loosen chips of minerals. These get to the aerator and clog it.
So I removed the aerator on the sink closest to the water supply, and opened it up.
Then I turned the water main on, and let it run a little bit, like 30 seconds.
Lo and behold! Some big, nasty chunks of minerals came out.
I cleaned out the aerator and reinstalled it, adding a bit of silicone grease onto the threads to help it along.
I also found an O-ring in the assorted washers to replace a seal in the aerator. Unfortunately, it wasn’t a perfect fit, but it seemed to work.
(BTW, the kitchen faucet is an old school Delta single handle that was installed in the late 70s or early 80s. They don’t stock this at the Home Depot or Lowe’s! You have to order it, or buy it from Delta, and it looks like the OG classic, but costs more because it’s got brass guts and a simple design. You have to replace the rubber and springy parts every 5 to 10 years, but it’s much better than the plastic-fantastic trash they make now. Also, when it leaks, it usually leaks upward, so the water flows from the handle into the sink, not just spraying water under the sink, where you don’t see it. The only problem with this is, it looks old, so if you install it for someone, hoping they appreciate it, you will be disappointed, because they wanted something that looked newer and trendy. Links to the current versions of the midcentury classic that lasts forever: https://media.deltafaucet.com/PartsDiagram/DPD-K-100LF-WF%20Rev%20B.pdf https://media.deltafaucet.com/PartsDiagram/DPD-K-120LF.pdf)
Checking My Work
I went into the shower and tried the faucets. They worked perfectly.
There was no leaking from the stems! This risk always exists: the packing is dried out and loose, so when the faucet is open, water leaks out from the stem. If this happens, you need to get some valve packing material, and do a bit of refurb on the stem.
It was a successful installation.
Total time was 2.5 hours, maybe 1/3 of it spent digging holes into the “washers”, and 1/3 of it gathering my tools and looking for supplies.